
Installing Kitchen Cabinets: Step 4 - Installation
TOOLS NEEDED FOR INSTALLATION
|
|
INSTALLING
Locate all wall studs using hammer and 12 or 16 penny nail. Locating should be done in a position that will be hidden by the installed cabinets.
Measure 16" from the corner and drive a nail. If it doesn't locate a stud, move 2" to the left or right and drive again until stud is located.
Measure 16" from the located stud and proceed as above to locate all studs behind cabinets.
WALL CABINETS
| Install wall cabinets first. Installed base cabinets would impede installation.
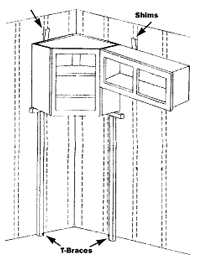
Place the wall corner cabinet at the desired height, measuring from the floor to the bottom of the cabinet. Make T-Braces to support the cabinet at this height. These T-Braces should be used to support the cabinets while they are leveled and installed. If necessary, shim each cabinet top, bottom or side to a level and plumb position. Use 2-1/2" screws through the back panel to fasten to the studs. Screw through shims if Install other wall cabinets outward from the corner. Clamp the next cabinet to the corner and use T-Braces for support. Shim the cabinet to maintain the face fronts flush and the cabinet level. Mount to the wall as before and join the cabinets (below). Note: Use extra care when installing the corner cabinet for best results. BASE CABINETS Join base cabinets at your worksite before installation, and mount them to the wall in a group. Shims should be placed as needed behind cabinet back and/or under toe-kick. |
 |
JOINING CABINETS
|
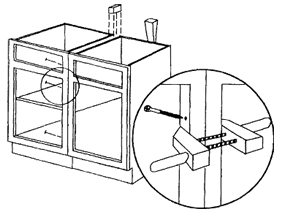
Join base cabinets at your worksite before installation. Remove doors and hinges. Place cabinets on their backs (for bases) and clamp them together, making sure Pre-drill through the face frame stiles a minimum of 1-1/4". Fasten cabinets together with 2-1/2" screws. Place cabinets upright and install spacer blocks between side panels, making sure spacers are flush with top and Note: All cabinets are joined in the same manner - clamp, flush face frames, pre-drill, fasten with screws, |
|
|
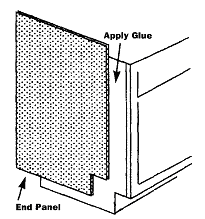
END PANELS Check for proper fit, and trim as needed. Notch the base panels to match the toe-kick space. Attach all finished end panels and toe-kick cover with glue and 3/8" brads. |
 |
|
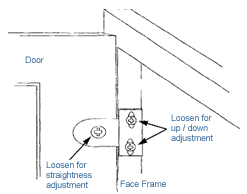
DOOR MOUNTING AND ALIGNMENT To remove doors without changing alignment, unscrew hinge at the face-frame. For minor door adjustment (up or down), loosen the screws holding the hinge plate to the face frame, slide the door up or down as necessary, and retighten. To align the door so it sits straight with the frame, loosen and adjust only the top or bottom hinge by sliding the door in or out on the hinge plate. Retighten. |
 |
That's all there is to it! If you have other specific questions that were not covered in this guide, feel free to write to us, or ask the cabinet professional in your local Sutherlands location.